分类 技术 下的文章

esxi通过nfs使用synology群晖nas扩展存储空间

esxi虚拟化的正确打开方式是:把esxi系统安装在u盘,tf卡,单块硬盘等上,而虚拟机存储在非易失性存储设备上,如多盘raid,nas等上。这样即使esxi系统挂了,数据也不会丢失。如果你恰好有nas,可以参考一下使用nfs扩展esxi存储空间,本文以esxi6.7和群晖nas为例。
首先打开群晖nas等nfs服务,默认是关闭的。步骤如下
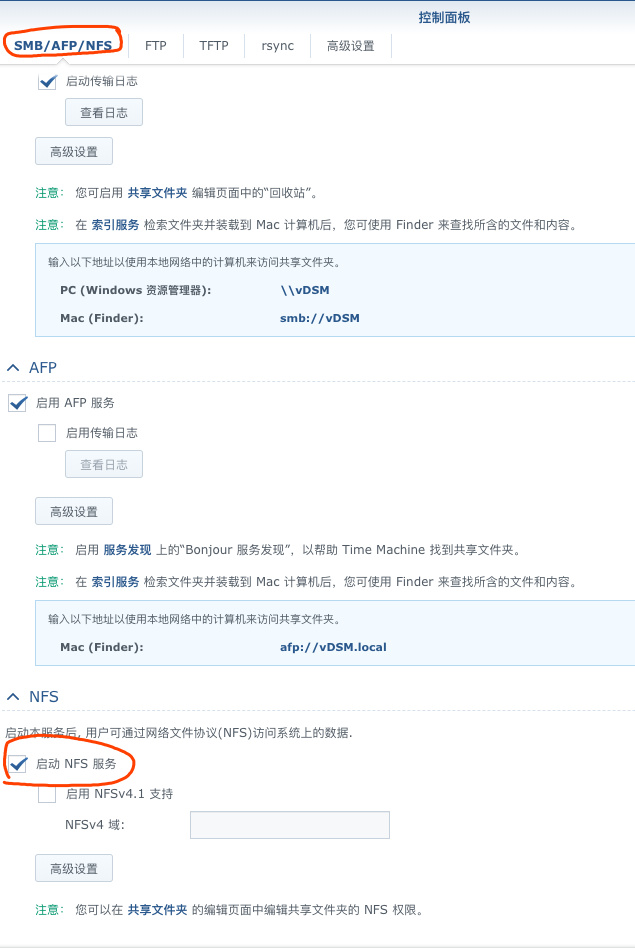
1,dsm的控制面板,文件服务,smb/afp/nfs,勾选启动nfs服务
启动nfs服务
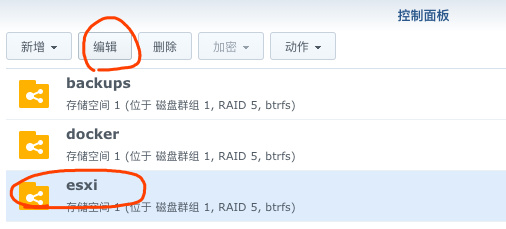
2,控制面板,共享文件夹,选中esxi要使用的文件夹,点击编辑
编辑共享文件夹
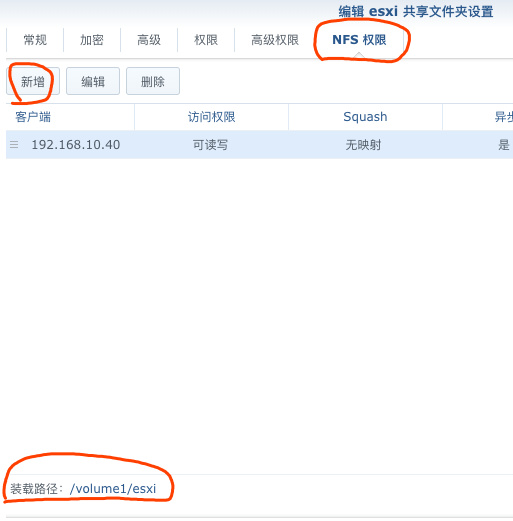
3,然后选中nfs权限,新增,记下装载路径
新增nfs客户端
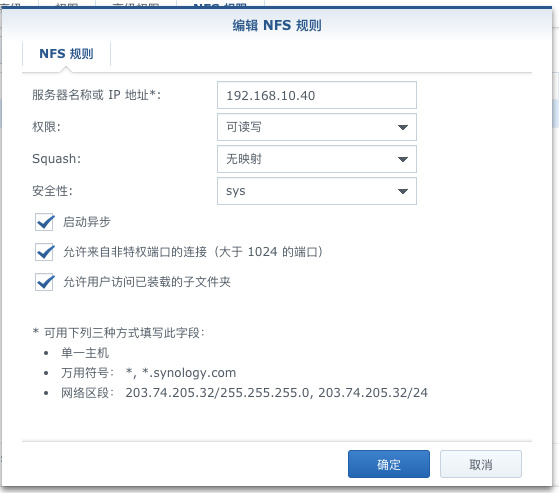
4,填入esxi的ip地址,权限可读写
nfs客户端

然后在esxi上添加nfs存储设备,步骤如下
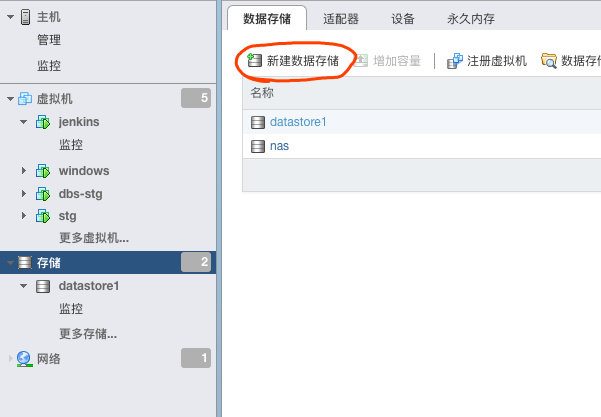
1,esxi的网络控制台,存储,数据存储,新建数据存储
新建数据存储
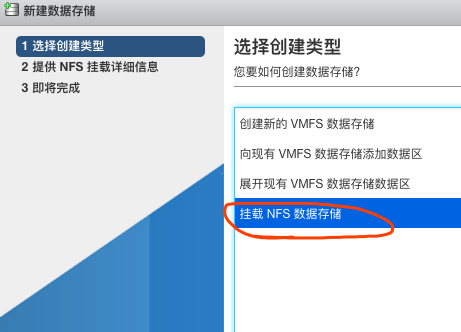
2,选择挂载nfs数据存储
选择挂载nfs
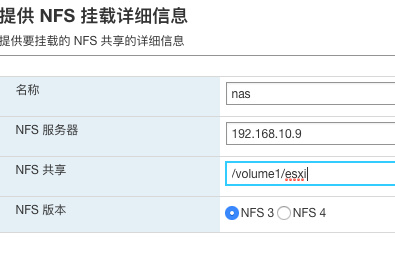
3,填入nas的ip地址,和挂载路径
填写nfs服务器信息
挂载成功后数据存储就会出现刚才添加的nas

nfs扩展的数据存储和系统盘在创建虚拟机,上传iso文件等没有使用上的区别

大数据迁移,10tb青云elasticsearch数据迁移阿里云elasticsearch

总的来说elasticsearch数据迁移有两种方法:
1,使用elasticdump 按条迁移,优点是被迁移的index可以写入,迁移中产生的新数据会一并迁移,缺点是速度比较慢;
2,使用elasticsearch自带的快照功能,优点是快,速度取决于网络或者硬盘速度,缺点迁移过程中产生的新数据不会迁移。

这里以elasticsearch的快照为例讲一下青云elasticsearch上10tb数据迁移到阿里云的过程。

1,在青云生成有对象存储权限的access_key和secret_key,在青云对象存储新建bucket:es-trans
2,在青云elasticsearch上创建使用对象存储的快照仓库

curl -XPUT 'http://192.168.150.3:9200/_snapshot/backup/' -d' {"type": "s3","settings": {"endpoint": "s3.pek3b.qingstor.com","access_key": "***","secret_key": "***","bucket": "es-trans","compress":"true"}}'

3,创建需要迁移的index的快照
3.1正常创建快照

curl -XPUT 'http://192.168.150.3:9200/_snapshot/backup/20180505' -d '{"indices": "index1,index2"}'

3.2强制创建快照(有未分配的主分片时需要强制创建快照)

curl -XPUT 'http://192.168.150.3:9200/_snapshot/backup/20180505' -d '{"indices": "index1,index2","partial": "true"}'

4,在阿里云生成有对象存储权限的access_key_id和secret_access_key,在阿里云创建对象存储bucket:es-trans
5,使用阿里云对象存储迁移工具ossimport把青云对象存储bucket:es-trans迁移到阿里云的对象存储bucket:es-trans,参考:https://help.aliyun.com/document_detail/57053.html?spm=a2c4g.11186623.6.1209.51f4663eMbJcKo
6,阿里云elasticsearch创建使用对象存储的快照仓库

curl -XPUT 'http://elastic:***@es-cn-***.elasticsearch.aliyuncs.com:9200/_snapshot/backup/' -d' {"type": "oss","settings": {"endpoint": "http://oss-cn-beijing-internal.aliyuncs.com","access_key_id": "***","secret_access_key": "***","bucket": "es-trans","compress":"true"}}'

7,恢复快照到阿里云es
7.1快照中的index全部原样恢复

curl -XPUT 'http://elastic:***@es-cn-***.elasticsearch.aliyuncs.com:9200/_snapshot/backup/20180505/_restore'

7.2原样恢复快照中部分index

curl -XPUT 'http://elastic:***@es-cn-***.elasticsearch.aliyuncs.com:9200/_snapshot/backup/20180505/_restore' -d '{"indices":"index1"}'

7.3恢复到新名字的index,并不包含原index的别名

curl -XPUT 'http://elastic:***@es-cn-***.elasticsearch.aliyuncs.com:9200/_snapshot/backup/20180505/_restore' -d '{"indices":"index1","include_aliases": false,"rename_pattern": "index1","rename_replacement": "new_index1"}'

8,其他可能用到的命令
8.1删除多个无用index

curl -XDELETE 'http://192.168.150.3:9200/index1,index2'

8.2设置集群磁盘写入阈值为95%,默认值为85%

curl -XPUT 'http://elastic:***@es-cn-***.elasticsearch.aliyuncs.com:9200/_cluster/settings' -d '{"transient": {"cluster.routing.allocation.disk.watermark.low": "95%"}}'

8.3设置index副本为0个

curl -XPUT 'http://elastic:***@es-cn-***.elasticsearch.aliyuncs.com:9200/index1/_settings' -d '{"number_of_replicas": 0}'

9,本次迁移数据约10tb,其中青云es快照写入对象存储约1000mbps,青云对象存储到阿里云对象存储约400mbps,阿里云对象存储的快照写入阿里云es约700mbps,可一个分成多个任务,同步进行,本次迁移约2天完成,如果使用elsaticdump迁移至少8天才能完成。

esxi升级安装patch补丁包

esxi6.7.0的iso发布已经有半年时间,期间vmware已经发布了三次patch补丁,记录一下升级过程。升级patch补丁只能在相同版本下。
1,下载补丁
下载patch补丁包地址:https://my.vmware.com/group/vmware/patch
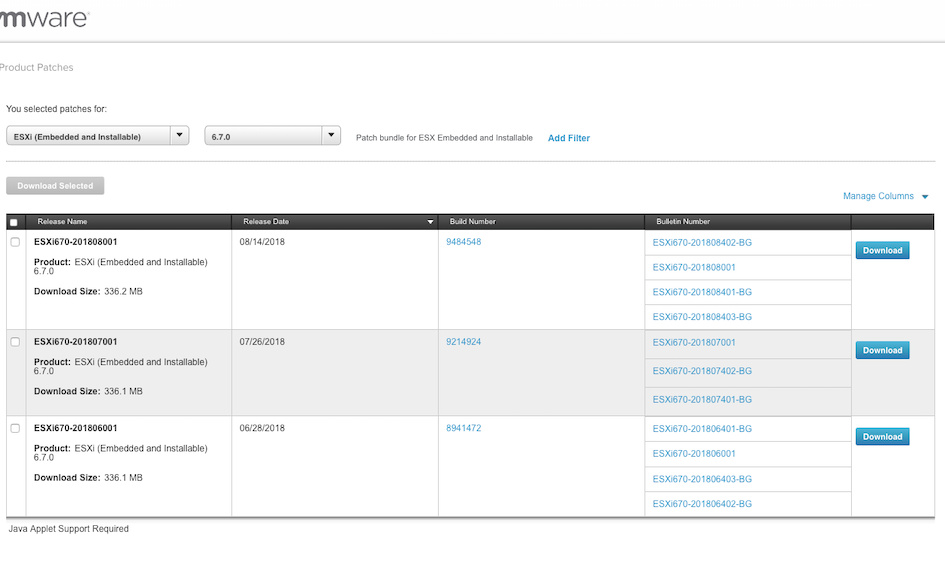
登陆后选择版本搜索patch包
如图
patch搜索
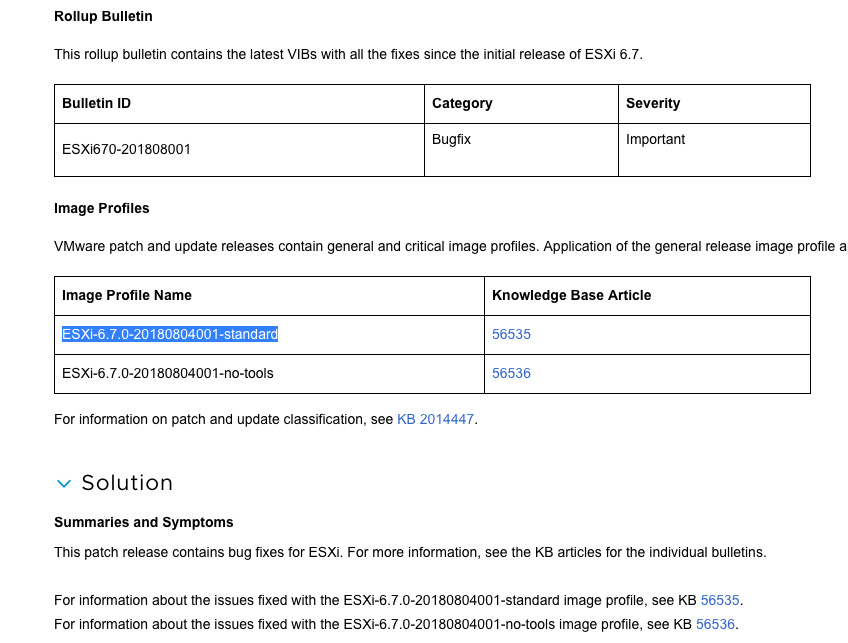
选择要升级的patch,点击下载,然后点击build number进入patch包具体说明页面拉到最后,找到Image Profile Name,复制出来
如图
patch详情
2,下载后上传到esxi
3,然后打开esxi的ssh
ssh登陆到esxi
执行命令

esxcli software profile update -d /vmfs/volumes/datastore1/update/ESXi670-201808001.zip -p ESXi-6.7.0-20180804001-standard

注意:上述命令中patch包文件路径需要绝对路径,不能使用当前目录的相对路径。
命令有结果前不会有提示,等待就行,成功到话会告诉你需要重启生效,还有更新了那些东西,失败的话会告诉你哪错了

最后退出并在webUI上关闭ssh,重启esxi。

记定时任务cron的一个坑,cron命令里面百分号%的意义

在使用elastic APM时候,现在的apm版本不支持自动删除过期index,需要使用curator手动删除或者添加到定时任务执行。
命令是

/usr/local/bin/curator_cli --host localhost delete_indices --filter_list '[{"filtertype":"pattern","kind":"prefix","value":"apm-6.3.1-"}, {"filtertype":"age","source":"name","timestring":"%Y.%m.%d","unit":"days","unit_count":20,"direction":"older"}]'

命令中有个根据index名中时间戳的判断,"timestring":"%Y.%m.%d",这中间使用了%,而%在cron里是有特殊含义的,需要转义处理,这之前没有遇到过,所以定时任务一直没成功。

以下内容来自网络

Cron daemon,是linux下用来周期性执行命令的守护进程。可以通过crontab命令列出和编辑用户的cron任务。

(1)cron任务的基本形式是:minute hour [day of month] month [day of week] command
cron任务执行时必须满足以下条件:分钟、小时和月份满足给定条件,并且day of month和day of week至少一个满足条件。

(2)在设置时间日期时,可以使用范围或者列表
比如以下命令会在每天0点到4点,8点到12点的1、2、5、9分钟执行command命令

1,2,5,9 0-4,8-12 * * * command

(3)在设置时间日期时,可以使用步长,步长仅对范围或者*有效
比如每5分钟执行command命令,可以

*/5 * * * * command

下面的命令会在第50、51、52、53、55、57、59分钟执行command命令

50,51,52,53-59/2 * * * * command

(4)month或者day of week域,可以使用星期或者月份的前三个字母,大小写都可以,但是此时不能使用范围或者列表。比如

* * * * Mon command

(5)在第6个域,也就是命令部分,%具有特殊含义,%之前的部分会被SHELL执行,%之后的部分将会作为前面部分的标准输入。如果确实需要使用%,请用\进行转义或者使用单引号(即\%或者'%',双引号"%"是无效的)。

(6)每隔一周执行一个任务,这样的任务cron是不支持的。但是我们可以通过一个trick实现,其它的每N天(周,年)也可以用类似的方式实现
每偶数周执行(注意%之前的),

* * * * * expr `date +\%W` \% 2 >/dev/null || command

每奇数周执行(最后的true命令,是为了避免cron在偶数周的时候提示非0返回码),

* * * * * expr `date +\%W` \% 2 >/dev/null && command  || true

(7)每90分钟执行命令,一个cron任务是不够的

0 0,3,6,9,12,15,18,21 * * * <commands>

30 1,4,7,10,13,16,19,22 * * * <commands>

(8)不同的Unix系统提供的cron功能略有差别,如果你使用的不是Linux,请man 5 crontab
windows使用ikev2遇到的坑,及批处理batch脚本和powershell脚本

2020.7.6更新:添加坑0,mtu问题

给公司测试ikev2 vpn,mac和ios一切正常,但是发现windows手动添加vpn有不少坑,总结一下,并附上批处理脚本(实际调用powershell)
以下在windows10下测试,ikev2服务器使用ubuntu下strongswan,代理所有路由,ikev2服务器安装脚本见之前文章https://www.willnet.net/index.php/archives/100/

坑0,windows的vpn虚拟网卡默认mtu是1400,
现象:如果服务端的mtu小于1400的话,会出现能ping通地址,但是网页不能打开的问题
解决办法:修改vpn虚拟网卡mtu值
连接vpn后,以管理员身份执行以下命令

netsh interface ipv4 set subinterface "vpn名称" mtu=1350  store=persistent

具体详见ikev2 客户端mtu引起的网络故障

坑1:
windows默认不支持DH2048_AES256协商协议
现象:提示策略匹配错误
解决办法:添加注册表项,不需要重启生效

HKEY_LOCAL_MACHINE\System\CurrentControlSet\Services\Rasman\Parameters里新建类型为DWORD的NegotiateDH2048_AES256 键,值设置为1

0 禁用AES-256-CBC和MODP-2048
1 启用AES-256-CBC和MODP-2048
2 强制使用AES-256-CBC和MODP-2048

坑2:
windows默认不支持Symmetric NAT类型路由器后的ikev2服务器
现象:提示809错误,或者提示路由器不支持nat
解决办法:添加注册表项,并需要重启生效

HKEY_LOCAL_MACHINE\SYSTEM\CurrentControlSet\Services\PolicyAgent里新建类型为DWORD的AssumeUDPEncapsulationContextOnSendRule 键,值设置为2

0
A value of 0 (zero) configures Windows so that it cannot establish security associations with servers that are located behind NAT devices. This is the default value.
1
A value of 1 configures Windows so that it can establish security associations with servers that are located behind NAT devices.
2
A value of 2 configures Windows so that it can establish security associations when both the server and the Windows Vista-based or Windows Server 2008-based VPN client computer are behind NAT devices.

坑3:
windows手动添加的vpn默认没有开启默认路由
现象:连接成功,但是对外ip没有改变
解决办法:手动添加修改或者使用powershell新建vpn连接,手动路径:控制面板\网络和 Internet\网络连接,vpn网卡,属性,网络,ipv4,属性,高级,勾选在远程网络上使用默认网关

坑4:
windows10默认开启了smart multi-homed name resolution功能
现象:有线网络下连接vpn后不使用vpn的dns
解决办法:修改vpn网卡的跃点数,小于有线网卡即可。脚本自动解决待更新

批处理脚本如下,实际是使用批处理调用powershell命令,由于需要修改注册表,需要管理员权限运行

install.cmd

@echo off&PUSHD %~DP0 &TITLE ikev2 VPN安装/卸载程序
mode con cols=160 lines=50
set TempFile_Name=%SystemRoot%\System32\BatTestUACin_SysRt%Random%.batemp
( echo "BAT Test UAC in Temp" >%TempFile_Name% ) 1>nul 2>nul
if exist %TempFile_Name% (
del %TempFile_Name% 1>nul 2>nul&&goto :address
) else (
echo;请以管理员身份运行,按任意键退出 &&goto :end
)

:address
cls
echo;请输入办公地点:
echo;1:北京
echo;2:成都
echo;3:重庆
set/p choose1=请输入选项并按回车:
echo %choose1%|findstr /i "[123]">nul&&goto :install
goto :address

:install
cls
echo;请选择安装或者卸载VPN(ikev2):
echo;i:安装
echo;u:卸载
echo;q:退出
set/p choose2=请输入选项并按回车:
echo %choose2%|findstr /i "[iuq]">nul&&goto :%choose1%%choose2%
goto :install

:1i
cls
echo;安装北京VPN
echo;===========================
echo;***步骤1:删除同名VPN***
(powershell -Command "& {Remove-VpnConnection -Name "北京办公室" -Force -PassThru;}") 1>nul 2>nul
echo;成功
echo;
echo;***步骤2:安装新的VPN***
powershell -Command "& {Add-VpnConnection -Name "北京办公室" -ServerAddress "beijing.example.com" -AuthenticationMethod "Eap" -EncryptionLevel "Maximum" -RememberCredential -TunnelType "Ikev2" -PassThru;}"
echo;成功
echo;
echo;***步骤3:清理注册表***
(powershell -Command "& {Remove-ItemProperty HKLM:\System\CurrentControlSet\Services\Rasman\Parameters -name "NegotiateDH2048_AES256"; Remove-ItemProperty HKLM:\System\CurrentControlSet\Services\PolicyAgent -name "AssumeUDPEncapsulationContextOnSendRule ";}") 1>nul 2>nul
echo;成功
echo;
echo;***步骤4:添加注册表***
(powershell -Command "& {New-ItemProperty HKLM:\System\CurrentControlSet\Services\Rasman\Parameters -name "NegotiateDH2048_AES256" -value 1 -propertyType dword; New-ItemProperty HKLM:\System\CurrentControlSet\Services\PolicyAgent -name "AssumeUDPEncapsulationContextOnSendRule " -value 2 -propertyType dword;}") 1>nul 2>nul
echo;成功
echo;
echo;***步骤5:设置注册表***
powershell -Command "& {Set-ItemProperty HKLM:\System\CurrentControlSet\Services\Rasman\Parameters -name "NegotiateDH2048_AES256" -value 1; Set-ItemProperty HKLM:\System\CurrentControlSet\Services\PolicyAgent -name "AssumeUDPEncapsulationContextOnSendRule " -value 2;}"
echo;成功
echo;
echo;***步骤6:重启电脑***
echo;按任意键重启电脑,或按右上角 X 退出后手动重启电脑
pause>nul
shutdown -r -t 0
goto :end

:1u
cls
echo;卸载北京VPN
echo;===========================
(powershell -Command "& {Remove-VpnConnection -Name "北京办公室" -Force -PassThru;}") 1>nul 2>nul
echo;成功,按任意键退出...
goto :end

:2i
cls
echo;安装成都VPN
echo;===========================
echo;***步骤1:删除同名VPN***
(powershell -Command "& {Remove-VpnConnection -Name "成都办公室" -Force -PassThru;}") 1>nul 2>nul
echo;成功
echo;
echo;***步骤2:安装新的VPN***
powershell -Command "& {Add-VpnConnection -Name "成都办公室" -ServerAddress "chengdu.example.com" -AuthenticationMethod "Eap" -EncryptionLevel "Maximum" -RememberCredential -TunnelType "Ikev2" -PassThru;}"
echo;成功
echo;
echo;***步骤3:清理注册表***
(powershell -Command "& {Remove-ItemProperty HKLM:\System\CurrentControlSet\Services\Rasman\Parameters -name "NegotiateDH2048_AES256"; Remove-ItemProperty HKLM:\System\CurrentControlSet\Services\PolicyAgent -name "AssumeUDPEncapsulationContextOnSendRule ";}") 1>nul 2>nul
echo;成功
echo;
echo;***步骤4:添加注册表***
(powershell -Command "& {New-ItemProperty HKLM:\System\CurrentControlSet\Services\Rasman\Parameters -name "NegotiateDH2048_AES256" -value 1 -propertyType dword; New-ItemProperty HKLM:\System\CurrentControlSet\Services\PolicyAgent -name "AssumeUDPEncapsulationContextOnSendRule " -value 2 -propertyType dword;}") 1>nul 2>nul
echo;成功
echo;
echo;***步骤5:设置注册表***
powershell -Command "& {Set-ItemProperty HKLM:\System\CurrentControlSet\Services\Rasman\Parameters -name "NegotiateDH2048_AES256" -value 1; Set-ItemProperty HKLM:\System\CurrentControlSet\Services\PolicyAgent -name "AssumeUDPEncapsulationContextOnSendRule " -value 2;}"
echo;成功
echo;
echo;***步骤6:重启电脑***
echo;按任意键重启电脑,或按右上角 X 退出后手动重启电脑
pause>nul
shutdown -r -t 0
goto :end

:2u
cls
echo;卸载成都VPN
echo;===========================
(powershell -Command "& {Remove-VpnConnection -Name "成都办公室" -Force -PassThru;}") 1>nul 2>nul
echo;成功,按任意键退出...
goto :end

:3i
cls
echo;安装重庆VPN
echo;===========================
echo;***步骤1:删除同名VPN***
(powershell -Command "& {Remove-VpnConnection -Name "重庆办公室" -Force -PassThru;}") 1>nul 2>nul
echo;成功
echo;
echo;***步骤2:安装新的VPN***
powershell -Command "& {Add-VpnConnection -Name "重庆办公室" -ServerAddress "chongqing.example.com" -AuthenticationMethod "Eap" -EncryptionLevel "Maximum" -RememberCredential -TunnelType "Ikev2" -PassThru;}"
echo;成功
echo;
echo;***步骤3:清理注册表***
(powershell -Command "& {Remove-ItemProperty HKLM:\System\CurrentControlSet\Services\Rasman\Parameters -name "NegotiateDH2048_AES256"; Remove-ItemProperty HKLM:\System\CurrentControlSet\Services\PolicyAgent -name "AssumeUDPEncapsulationContextOnSendRule ";}") 1>nul 2>nul
echo;成功
echo;
echo;***步骤4:添加注册表***
(powershell -Command "& {New-ItemProperty HKLM:\System\CurrentControlSet\Services\Rasman\Parameters -name "NegotiateDH2048_AES256" -value 1 -propertyType dword; New-ItemProperty HKLM:\System\CurrentControlSet\Services\PolicyAgent -name "AssumeUDPEncapsulationContextOnSendRule " -value 2 -propertyType dword;}") 1>nul 2>nul
echo;成功
echo;
echo;***步骤5:设置注册表***
powershell -Command "& {Set-ItemProperty HKLM:\System\CurrentControlSet\Services\Rasman\Parameters -name "NegotiateDH2048_AES256" -value 1; Set-ItemProperty HKLM:\System\CurrentControlSet\Services\PolicyAgent -name "AssumeUDPEncapsulationContextOnSendRule " -value 2;}"
echo;成功
echo;
echo;***步骤6:重启电脑***
echo;按任意键重启电脑,或按右上角 X 退出后手动重启电脑
pause>nul
shutdown -r -t 0
goto :end

:3u
cls
echo;卸载重庆VPN
echo;===========================
(powershell -Command "& {Remove-VpnConnection -Name "重庆办公室" -Force -PassThru;}") 1>nul 2>nul
echo;成功,按任意键退出...
goto :end

:end
pause>nul

powershell脚本,需要以管理员身份运行powershell然后执行install.ps1
install.ps1

Remove-VpnConnection -Name "成都办公室" -Force

Add-VpnConnection -Name "成都办公室" -ServerAddress "chengdu.example.com" -AuthenticationMethod "Eap" -EncryptionLevel "Maximum" -RememberCredential -TunnelType "Ikev2"

Remove-ItemProperty HKLM:\System\CurrentControlSet\Services\Rasman\Parameters -name "NegotiateDH2048_AES256"

Remove-ItemProperty HKLM:\System\CurrentControlSet\Services\PolicyAgent -name "AssumeUDPEncapsulationContextOnSendRule"

New-ItemProperty HKLM:\System\CurrentControlSet\Services\Rasman\Parameters -name "NegotiateDH2048_AES256" -value 1 -propertyType dword

New-ItemProperty HKLM:\System\CurrentControlSet\Services\PolicyAgent -name "AssumeUDPEncapsulationContextOnSendRule" -value 2 -propertyType dword

Set-ItemProperty HKLM:\System\CurrentControlSet\Services\Rasman\Parameters -name "NegotiateDH2048_AES256" -value 1

Set-ItemProperty HKLM:\System\CurrentControlSet\Services\PolicyAgent -name "AssumeUDPEncapsulationContextOnSendRule " -value 2