标签 unifi 下的文章
unifi的cloud key 替换https证书及遇到的坑
20191023更新:最新版cloudkey系统keytool软连接到了错误位置
/usr/lib/jvm/java-8-openjdk-armhf/jre/bin/keytool -importkeystore -srckeystore unifi.p12 -srcstoretype PKCS12 -srcstorepass aircontrolenterprise -destkeystore unifi.keystore.jks -storepass aircontrolenterprise
此外新版开机证书检测脚本把cert.tar的目录改到了/root/etc/ssl/private,需要注意。更正打包命令,删除cloudkey.crt cloudkey.key unifi.keystore.jks的路径。
unifi的cloud key的web页面默认使用的是自签名的证书,打开时浏览器会提示不信任的页面,从阿里云或者其他地方免费获取证书后替换就能显示小绿锁了。想着替换一个证书而已,没想到这中间还有坑。
首先简单介绍一下cloud key的web架构
首先是80端口,请求http后会返回301跳转到https,然后打开入口页面,一个是unifi controller,一个是cloud key管理
80端口和443端口是nginx监听的,cloud key 管理页面是443端口,但是unifi controller使用的是8443端口,这个是java的
检查nginx配置发现ssl证书在/etc/ssl/private目录下,有cloudkey.crt和cloudkey.key,nginx证书替换好办,直接把新申请的域名证书内容覆盖cloudkey.crt和cloudkey.key内容即可。
麻烦的是java使用的证书,在网上找到办法,需要根据cloudkey.crt和cloudkey.key生产p12格式证书,在用工具生成Java用的证书unifi.keystore.jks,方法如下
cd /etc/ssl/private
openssl pkcs12 -export -in cloudkey.crt -inkey cloudkey.key -out unifi.p12 -name unifi -password pass:aircontrolenterprise
keytool -importkeystore -srckeystore unifi.p12 -srcstoretype PKCS12 -srcstorepass aircontrolenterprise -destkeystore unifi.keystore.jks -storepass aircontrolenterprise
service nginx restart
service unifi restart
现在使用域名打开unifi controller页面,小绿锁出现了。
然后就遇到坑了,重启发现证书又变成了自签名,这就尴尬了,重启不能保存这则么能行。google后有说cloud key重启会重置文件系统的,但是查看df -h,和经过测试,发现并不会重置,那就是有开机脚本操作了。再搜索,ubnt的英文论坛里说/usr/share/initramfs-tools/scripts/ubnt-bottom/configure-sslcert这个脚本每次开机执行,检查/etc/ssl/private/cert.tar这个压缩包里的证书是否和/etc/ssl/private里的一致。分析脚本发现,只要这个tar包只要是非0字节就会解压到临时目录,对比/etc/ssl/private里证书,如果不一致则情况重新生成,并更新cert.tar。
到此,只要保持cert.tar里面到三个文件和外面到一致就可以了。注意,打包时cloudkey.crt cloudkey.key unifi.keystore.jks三个文件不要带路径。
cd /etc/ssl/private && tar cvf /root/etc/ssl/private/cert.tar cloudkey.crt cloudkey.key unifi.keystore.jks
重启,小绿锁还在。
转一个脚本
#!/usr/bin/env bash

###################################################
# Instructions to replace self-signed certificate #
###################################################
# 1. Save this script file to your cloud key
# 2. Use chmod to make this script executable:
#    chmod u+x cloudkeycert.sh
# 3. Create a certificate signing request (CSR) and private key
#    including the Subject Alternate Name (SAN) field.
#    Chrome will complain if the SAN field is missing.
#    There are many tools out there to create the CSR and
#    key file:
#    * - XCA (https://sourceforge.net/projects/xca/)
#    * - Digicert util (https://www.digicert.com/util/)
#    * - etc.
# 4. Have the CSR signed.
# 5. Ensure the signed certificate and key are in PEM (Base64) format
# 6. In the root home directory (/root), copy the signed cert
#    and key using the following names:
#    * - Certificate -> cloudkey.crt
#    * - Private Key -> cloudkey.key
# 7. Then run this script.  It will backup the existing files
#    in case you need to back out, copy the new files into place,
#    and update the keystore file.  It will stop/start the
#    web server (NGINX) and the Unifi services.  You may need
#    to close your browser as it may not pick up on the fact that
#    the certificate changed...
#
# OpenSSL and Keytool options copied from script:
#    /usr/share/initramfs-tools/scripts/ubnt-bottom/configure-sslcert
# the only added option to the keytool was -noprompt to force
# overwriting the unifi alias rather than requiring the user
# to answer the prompt

HOSTCERTDIR=/etc/ssl/private
HOSTCERTTAR=cert.tar
HOSTCERTS="cloudkey.crt cloudkey.key unifi.keystore.jks"
BACKUPDIR="${HOSTCERTDIR}/`/bin/date +%Y%m%d`"
BACKUPFILE="`/bin/date +%Y%m%d%H%M`-cert.tar"

echo "Stopping the unifi service"
/usr/sbin/service unifi stop

echo "Stopping the NGINX web server"
/usr/sbin/service nginx stop

# Change to certificate directory
cd ${HOSTCERTDIR}

# Create a backup of the existing bits just in case
if [ ! -d ${BACKUPDIR} ]; then
        echo "Making directory ${BACKUPDIR}"
        mkdir ${BACKUPDIR}
fi

if [ ! -f ${HOSTCERTDIR}/${BACKUPFILE} ]; then
        echo "Creating tar ${BACKUPDIR}/${BACKUPFILE}"
        /bin/tar -cf ${BACKUPDIR}/${BACKUPFILE} ${HOSTCERTS}
fi

# Copy the certificate files from /root
/bin/cp /root/cloudkey.key ${HOSTCERTDIR}/
/bin/cp /root/cloudkey.crt ${HOSTCERTDIR}/

# Build the keystore file from the cloudkey.key and cloudkey.crt
/usr/bin/openssl pkcs12 -export -in ${HOSTCERTDIR}/cloudkey.crt -inkey ${HOSTCERTDIR}/cloudkey.key \
        -out /tmp/keystore.p12 -name unifi -password pass:'' && \
/usr/bin/keytool -importkeystore -deststorepass aircontrolenterprise \
        -destkeypass aircontrolenterprise -destkeystore ${HOSTCERTDIR}/unifi.keystore.jks \
        -srckeystore /tmp/keystore.p12 -srcstoretype PKCS12 -srcstorepass '' -alias unifi -noprompt

# Create the tar file after the keystore file is created
cd ${HOSTCERTDIR}
/bin/tar -cf ${HOSTCERTTAR} ${HOSTCERTS}


echo "Starting the NGINX web server"
/usr/sbin/service nginx start

echo "Starting the unifi service"
/usr/sbin/service unifi start

echo "You may need to restart your browser so it will notice the updated certificate"家用万兆网络的降级和升级(201807)
去年分享了我家的万兆网络拓扑 https://www.willnet.net/index.php/archives/88/
今年有降级有升级,如图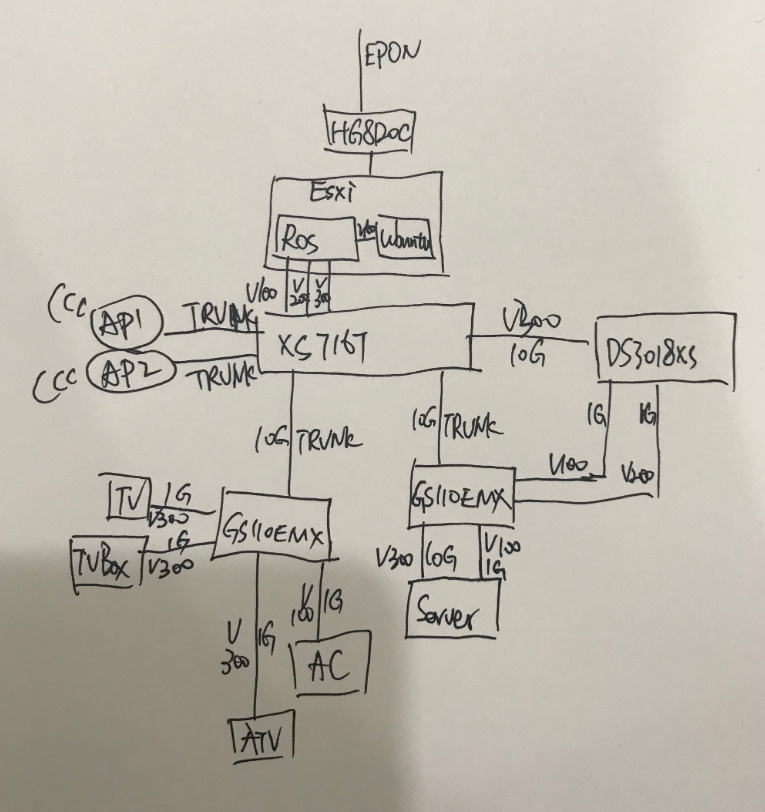
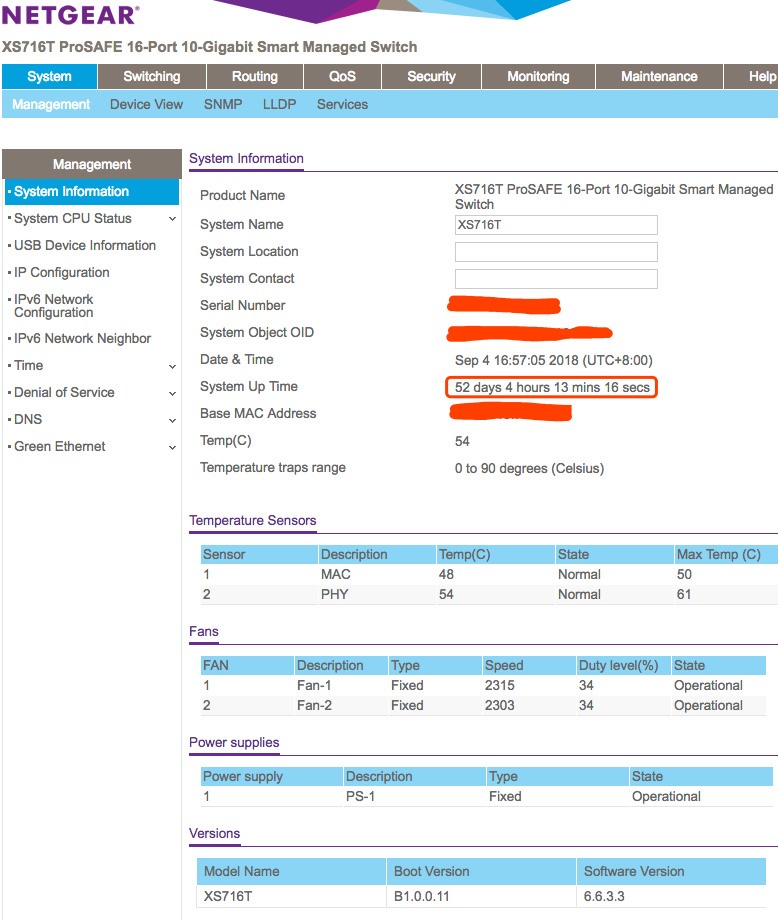
1.主要的降级是核心交换机从 netgear 的 m4300-24x 降级为 xs716t,降级原因功耗太高,并且噪音稍高,降级后功耗减少一半,噪音基本听不到了
2.其次降级的是路由器,由之前多个独立路由器切换到 esxi 上的 routeros,功耗降低,方便统一管理,esxi 上自建 dns,自建 ikev2,自建 ss,esxi 是研凌的 7200u+32g 内存,安装 esxi6.7
3.升级的是接入交换机,gs108tv2 更换成两个 gs110emx,两个 10g 电口,带 vlan 和链路聚合,功能满足需求
4.其次升级是无线,原来全套 cisco 更换成 unifi 的,两个 uap-ac-shd,一个 key 控制器
5.还有升级是联通家用 500m 更换成联通光快线,1 个固定公网 ip
6.其他变化还有,联通电视盒子撤了,经常影音不同步;加了一个 dnet 的专机;小米盒子国际版换成了 appletv ; nas 由 716+换成 ds3018xs+intel 的 x550 万兆网卡,局域网上传下载在 700m 左右; gen8 吃灰有几个月了;雷电 3 万兆网卡换成了 akitio 的 thunder3 network adapter,passive cooling,静音。
总体是朝着静音&全万兆升级。 ps:都是 rj45 电口,网线是超五类。
pps:xs716t 自带风扇有高频噪音,已更换猫扇A4x20 PWM,温度升高10度,但是噪音几乎没有了,日常功率约45w-50w,比m4300的90w降低近一半。
2018年9月更新,更换猫扇的xs716t截图