分类 全部文章 下的文章

阿里云云解析ddns的自动更新shell脚本

今天需要用到阿里云云解析做ddns,网上搜到到都是基于阿里云python sdk的脚本,这么一个简单功能没必要用python,找到一个openwrt的shell脚本,拿来改了一下运行环境,和环境变量,在x86下ubuntu 16.04测试通过。

原脚本地址https://github.com/h46incon/AliDDNSBash ,在此感谢

我修改过的脚本地址https://github.com/trepwq/aliyunddns

使用方法
安装依赖
首先需要一个shell

然后安装 bind-dig,curl,openssl-util。

修改脚本的setting代码段
其中DomainRecordId不清楚的话暂时不用修改,DNSServer修改为你在万网上使用的DNS服务器。 如:

AccessKeyId="MyID"
AccessKeySec="MySecret"
DomainRecordId="00000"
DomainRR="www"
DomainName="example.com"
DomainType="A"
DNSServer="dns9.hichina.com"

如果不清楚DomainRecordId的话,修改main函数,在里面调用describe_record,如:

main()
    {
    describe_record
    #update_record
    }

然后执行这个脚本。如果没问题的话,就能获取到域名的所有解析记录的列表了:

{"PageNumber":1,"TotalCount":1,"PageSize":1,"RequestId":"0000","DomainRecords":{"Record":[{"RR":"www","Status":"ENABLE","Value":"8.8.8.8","RecordId":"21332133","Type":"A","DomainName":"example.com","Locked":false,"Line":"default","TTL":"600"},]}}HttpCode:200

上面的结果中,RecordId为21332133。得到结果后再修改DomainRecordId为正确的值。

修改main函数:

main()
{
    #describe_record
    update_record
}

执行脚本即可。脚本会在本机IP地址和当前域名解析设置不同的时候调用API更新设置。

最后,在crontab里添加每分钟执行一次即可

crontab -e
* * * * * /root/ddns.sh >>/dev/null 2>&1
cisco交换机与netgear交换机配置链路聚合

以思科WS-C3560X-24P和网件GS116Ev2为例,由于GS116Ev2只支持static lag,所以以下为trunk的静态链路聚合。trunk可以理解为传递vlan的链接。如果只是某个vlan的链路聚合的话修改trunk为access。
思科配置

ssh -oHostKeyAlgorithms=+ssh-dss -oKexAlgorithms=+diffie-hellman-group1-sha1 cisco@ip
Password: 
Core_Switch>enable
Password: 
Core_Switch#configure terminal 
Enter configuration commands, one per line.  End with CNTL/Z.
Core_Switch(config)#interface Port-Channel 4
Core_Switch(config-if)#description To_GS116Ev2
Core_Switch(config-if)#switchport trunk encapsulation dot1q
Core_Switch(config-if)#switchport mode trunk
Core_Switch(config-if)#interface GigabitEthernet0/1
Core_Switch(config-if)#switchport trunk encapsulation dot1q
Core_Switch(config-if)#switchport mode trunk
Core_Switch(config-if)#channel-group 4 mode on
Core_Switch(config-if)#interface GigabitEthernet0/2
Core_Switch(config-if)#switchport trunk encapsulation dot1q
Core_Switch(config-if)#switchport mode trunk
Core_Switch(config-if)#channel-group 4 mode on
Core_Switch(config-if)#exit
Core_Switch(config)#exit
Core_Switch#

网件配置
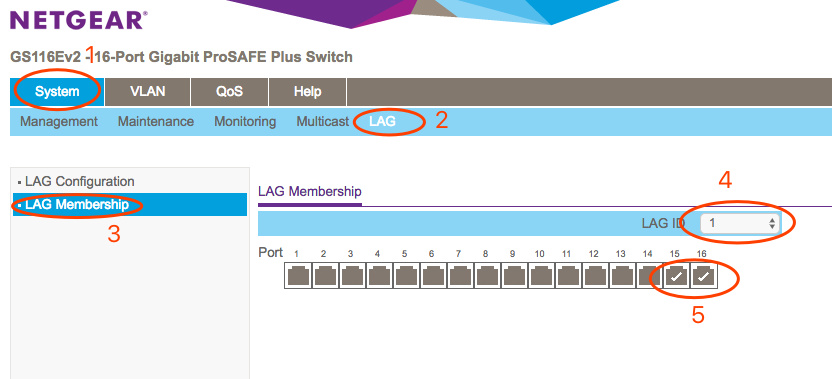
1,选择需要聚合的端口,按图勾选配置,然后apply
网件1
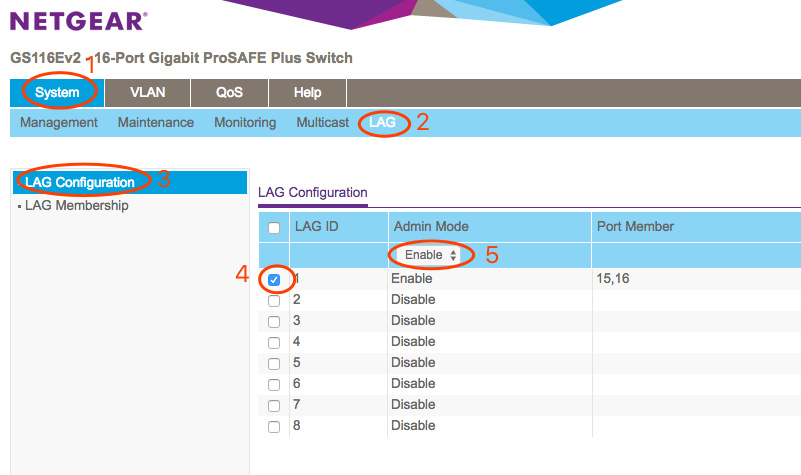
2,启用聚合,如图,然后点击apply
网件2

至此,两台交换机配置完毕,连接两根网线,等待几分钟后完成。
思科交换机查看链路聚合状态方法

Core_Switch#show etherchannel summary 
Flags:  D - down        P - bundled in port-channel
        I - stand-alone s - suspended
        H - Hot-standby (LACP only)
        R - Layer3      S - Layer2
        U - in use      f - failed to allocate aggregator

        M - not in use, minimum links not met
        u - unsuitable for bundling
        w - waiting to be aggregated
        d - default port


Number of channel-groups in use: 4
Number of aggregators:           4

Group  Port-channel  Protocol    Ports
------+-------------+-----------+-----------------------------------------------
1      Po1(SU)          -        Gi0/21(P)   Gi0/22(P)   
2      Po2(SU)          -        Gi0/19(P)   Gi0/20(P)   
3      Po3(SU)          -        Gi0/17(P)   Gi0/18(P)   
4      Po4(SD)          -        Gi0/11(D)   Gi0/12(D)   

网件由于是简单网管交换机,没有状态显示。需要注意的是网件启用lag的admin后需要等几分钟才会生效。

unifi的cloud key 替换https证书及遇到的坑

20191023更新:最新版cloudkey系统keytool软连接到了错误位置

/usr/lib/jvm/java-8-openjdk-armhf/jre/bin/keytool -importkeystore -srckeystore unifi.p12 -srcstoretype PKCS12 -srcstorepass aircontrolenterprise -destkeystore unifi.keystore.jks -storepass aircontrolenterprise

此外新版开机证书检测脚本把cert.tar的目录改到了/root/etc/ssl/private,需要注意。更正打包命令,删除cloudkey.crt cloudkey.key unifi.keystore.jks的路径。

unifi的cloud key的web页面默认使用的是自签名的证书,打开时浏览器会提示不信任的页面,从阿里云或者其他地方免费获取证书后替换就能显示小绿锁了。想着替换一个证书而已,没想到这中间还有坑。
首先简单介绍一下cloud key的web架构
首先是80端口,请求http后会返回301跳转到https,然后打开入口页面,一个是unifi controller,一个是cloud key管理
80端口和443端口是nginx监听的,cloud key 管理页面是443端口,但是unifi controller使用的是8443端口,这个是java的
检查nginx配置发现ssl证书在/etc/ssl/private目录下,有cloudkey.crt和cloudkey.key,nginx证书替换好办,直接把新申请的域名证书内容覆盖cloudkey.crt和cloudkey.key内容即可。
麻烦的是java使用的证书,在网上找到办法,需要根据cloudkey.crt和cloudkey.key生产p12格式证书,在用工具生成Java用的证书unifi.keystore.jks,方法如下

cd /etc/ssl/private
openssl pkcs12 -export -in cloudkey.crt -inkey cloudkey.key -out unifi.p12 -name unifi -password pass:aircontrolenterprise
keytool -importkeystore -srckeystore unifi.p12 -srcstoretype PKCS12 -srcstorepass aircontrolenterprise -destkeystore unifi.keystore.jks -storepass aircontrolenterprise
service nginx restart
service unifi restart

现在使用域名打开unifi controller页面,小绿锁出现了。
然后就遇到坑了,重启发现证书又变成了自签名,这就尴尬了,重启不能保存这则么能行。google后有说cloud key重启会重置文件系统的,但是查看df -h,和经过测试,发现并不会重置,那就是有开机脚本操作了。再搜索,ubnt的英文论坛里说/usr/share/initramfs-tools/scripts/ubnt-bottom/configure-sslcert这个脚本每次开机执行,检查/etc/ssl/private/cert.tar这个压缩包里的证书是否和/etc/ssl/private里的一致。分析脚本发现,只要这个tar包只要是非0字节就会解压到临时目录,对比/etc/ssl/private里证书,如果不一致则情况重新生成,并更新cert.tar。
到此,只要保持cert.tar里面到三个文件和外面到一致就可以了。注意,打包时cloudkey.crt cloudkey.key unifi.keystore.jks三个文件不要带路径。

cd /etc/ssl/private && tar cvf /root/etc/ssl/private/cert.tar cloudkey.crt cloudkey.key unifi.keystore.jks

重启,小绿锁还在。

转一个脚本

#!/usr/bin/env bash

###################################################
# Instructions to replace self-signed certificate #
###################################################
# 1. Save this script file to your cloud key
# 2. Use chmod to make this script executable:
#    chmod u+x cloudkeycert.sh
# 3. Create a certificate signing request (CSR) and private key
#    including the Subject Alternate Name (SAN) field.
#    Chrome will complain if the SAN field is missing.
#    There are many tools out there to create the CSR and
#    key file:
#    * - XCA (https://sourceforge.net/projects/xca/)
#    * - Digicert util (https://www.digicert.com/util/)
#    * - etc.
# 4. Have the CSR signed.
# 5. Ensure the signed certificate and key are in PEM (Base64) format
# 6. In the root home directory (/root), copy the signed cert
#    and key using the following names:
#    * - Certificate -> cloudkey.crt
#    * - Private Key -> cloudkey.key
# 7. Then run this script.  It will backup the existing files
#    in case you need to back out, copy the new files into place,
#    and update the keystore file.  It will stop/start the 
#    web server (NGINX) and the Unifi services.  You may need
#    to close your browser as it may not pick up on the fact that
#    the certificate changed...
#
# OpenSSL and Keytool options copied from script:
#    /usr/share/initramfs-tools/scripts/ubnt-bottom/configure-sslcert
# the only added option to the keytool was -noprompt to force
# overwriting the unifi alias rather than requiring the user
# to answer the prompt

HOSTCERTDIR=/etc/ssl/private
HOSTCERTTAR=cert.tar
HOSTCERTS="cloudkey.crt cloudkey.key unifi.keystore.jks"
BACKUPDIR="${HOSTCERTDIR}/`/bin/date +%Y%m%d`"
BACKUPFILE="`/bin/date +%Y%m%d%H%M`-cert.tar"

echo "Stopping the unifi service"
/usr/sbin/service unifi stop

echo "Stopping the NGINX web server"
/usr/sbin/service nginx stop

# Change to certificate directory
cd ${HOSTCERTDIR}

# Create a backup of the existing bits just in case
if [ ! -d ${BACKUPDIR} ]; then
        echo "Making directory ${BACKUPDIR}"
        mkdir ${BACKUPDIR}
fi

if [ ! -f ${HOSTCERTDIR}/${BACKUPFILE} ]; then
        echo "Creating tar ${BACKUPDIR}/${BACKUPFILE}"
        /bin/tar -cf ${BACKUPDIR}/${BACKUPFILE} ${HOSTCERTS}
fi

# Copy the certificate files from /root
/bin/cp /root/cloudkey.key ${HOSTCERTDIR}/
/bin/cp /root/cloudkey.crt ${HOSTCERTDIR}/

# Build the keystore file from the cloudkey.key and cloudkey.crt
/usr/bin/openssl pkcs12 -export -in ${HOSTCERTDIR}/cloudkey.crt -inkey ${HOSTCERTDIR}/cloudkey.key \
        -out /tmp/keystore.p12 -name unifi -password pass:'' && \
/usr/bin/keytool -importkeystore -deststorepass aircontrolenterprise \
        -destkeypass aircontrolenterprise -destkeystore ${HOSTCERTDIR}/unifi.keystore.jks \
        -srckeystore /tmp/keystore.p12 -srcstoretype PKCS12 -srcstorepass '' -alias unifi -noprompt

# Create the tar file after the keystore file is created
cd ${HOSTCERTDIR}
/bin/tar -cf ${HOSTCERTTAR} ${HOSTCERTS}


echo "Starting the NGINX web server"
/usr/sbin/service nginx start

echo "Starting the unifi service"
/usr/sbin/service unifi start

echo "You may need to restart your browser so it will notice the updated certificate"

记esxi登陆的一个坑

密码一直保存在chrome上,一次登陆同域名下的网页不小心update了esxi的账号和密码,这其实是chrome的锅,二级域名都不一样居然合并了。
然后登陆esxi,按惯例自动填充用户名密码,然后点登陆,密码错误登陆失败,此时脑抽,换了另一个错误密码,还是密码错误登陆失败,又换了一个错误密码,密码错误登陆失败,尝试另一个密码(后来才知道此为正确密码),还是密码错误登陆失败。
一下就慌了,因为如果忘记了esxi的root密码那么意味着只有重装esxi,由于物理原因,重装一次esxi将浪费一天时间。。。
尝试各种密码组合都是提示密码错误登陆失败,这个就是esxi的大坑,一旦被封锁,根本不提示你,即使你输入正确密码也告诉你密码错误。只能等到封锁时间结束。

阿里云日志服务每天自动发送统计http 4xx 5xx数量

借助阿里云日志服务cli还可以干更多,比如统计每天http 4xx 和 5xx数量。
这个脚本重点在awk的使用,提取字段和拼接字段。

www4xx5xx.sh

#! /bin/bash
PATH=/bin:/sbin:/usr/bin:/usr/sbin:/usr/local/bin:/usr/local/sbin:~/bin
export PATH
ALIYUN_LOG_CLI_ACCESSID=
ALIYUN_LOG_CLI_ACCESSKEY=
ALIYUN_LOG_CLI_ENDPOINT=cn-beijing.log.aliyuncs.com
export ALIYUN_LOG_CLI_ACCESSID
export ALIYUN_LOG_CLI_ACCESSKEY
export ALIYUN_LOG_CLI_ENDPOINT


function portal4xx(){
    todaytime=$(date "+%Y-%m-%d %H:%M:%S %Z")
    yesterdaytime=$(date -d '1 days ago' "+%Y-%m-%d %H:%M:%S %Z")
    current4xx=$(aliyun log get_log_all --project="www" --logstore="www-nginx-access" --query="status>=400 and status<500| select status,count(*)  as count group by status ORDER BY status ASC" --from_time="$yesterdaytime" --to_time="$todaytime" --jmes-filter="join('\n', map(&to_string(@), @))" |awk -F "[\"]" '{print $10":"$12","$2":"$4}' |awk '{{printf"%s\\n",$0}}')
    curl -H "Content-type: application/json" -X POST -d '{"text": "last 24h 4xx stats:\n'"${current4xx}"'"}' https://example/incoming/xxx
}

function portal5xx(){
    todaytime=$(date "+%Y-%m-%d %H:%M:%S %Z")
    yesterdaytime=$(date -d '1 days ago' "+%Y-%m-%d %H:%M:%S %Z")
    current5xx=$(aliyun log get_log_all --project="www" --logstore="www-nginx-access" --query="status>=500 and status<600| select status,count(*)  as count group by status ORDER BY status ASC" --from_time="$yesterdaytime" --to_time="$todaytime" --jmes-filter="join('\n', map(&to_string(@), @))" |awk -F "[\"]" '{print $10":"$12","$2":"$4}' |awk '{{printf"%s\\n",$0}}')
    curl -H "Content-type: application/json" -X POST -d '{"text": "last 24h 5xx stats:\n'"${current5xx}"'"}' https://example.com/incoming/xxx
}
portal4xx
portal5xx

上面脚本中比较折腾人的是要把下面格式写成json格式发出去

"count":"2171" "status":"403"
"count":"3529" "status":"404"
"count":"283" "status":"499"

把上面格式写成json如下

{"text": "last 24h 5xx stats:\ncount:2171,status:403\ncount:3529,status:404\ncount:283,status:499"}

双引号去掉容易,难的是把多行间真实的换行替换成字符串\n,这里使用awk '{{printf"%s\n",$0}}'